Make a free, performant and scalable personal website using Hugo, a static site generator
Table of Contents
I want a personal blog site. I want it to be performant, scalable, easy to maintain, and free… I’m not asking too much right? Well it turns out static site generators make this completely possible! This post is about how I configured this very website. Follow along if you’d like to make your own site like this one.
If you want to skip my decision making process, and skip to the get-shit-done part, click here.
Design goals
- Free, or basically free.
- Easy to maintain. No patching servers, no cert configuration, etc. I don’t want to worry when the next Heartbleed or Shellshock happens.
- Performant
- Scalable (within reason)
- Custom domain
- No third-party branding
- No ads
Options analysis
Here’s the short path I took before finding Hugo:
Wordpress.com
Wordpress is an obvious choice for a personal blog. And Wordpress.com is the commercial SaaS offering.
Scalable? Good enough
Performant? Good enough.
Maintainability? Easy.
Cost? AU$10/month. AU$33/month if you want to install plugins or do any real customisation. Too expensive.
Wordpress(.org) on a VM
I’ve installed Wordpress countless times, it’s not that hard. Surely this is cheaper, at the cost of some maintainability? Well it turns out you need a decently powered machine to power the old slow beast that is Wordpress. It only really makes sense if you’re hosting many sites with shared infrastructure.
The cheapest AWS EC2 instance that could handle a small Wordpress site, t3a.micro, is nearly AU$10/month. Double that cost to use my prefered cloud provider, Azure. And 1GB of RAM might be struggling after a few plugins installed. Too expensive (not free), and doesn’t meet maintability goal.
Squarespace, Wix, <insert generic drag-and-drop website builders>
These are great services. I’d recommend them to my friends and family. But no service meets all my design goals while also sticking to their free plans. Too expensive.
Static Site Generators!
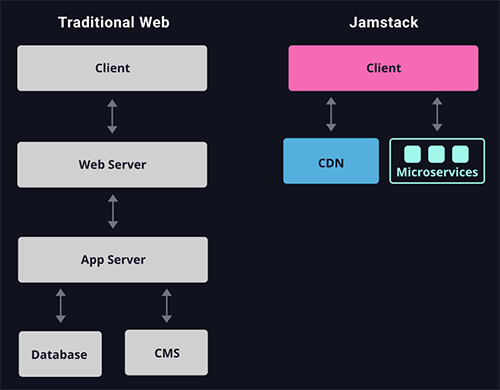
It’s about now that I started looking into Static Site Generators (SSG’s). I’m comfortable with the LAMP stack. I’ve dabbled with MEAN and MERN/MEVN/etc stacks. But I’d never heard of the JAMstack approach until I started looking into static site generators. This simple image from jamstack.org gets the idea across:
When you search for SSG’s, you get lots…
Publii
I tried Publii first – it’s a really cool tool! A simple desktop app which acts as a CMS and spits out a static site for you. But unfortunately it’s way too limited for my liking. It might be a great SSG for non-techies who want a free & performant site, while still having an easy to use “backend” CMS. But it’s not for me.
Jekyll
I gave Jekyll a go next. I thought GitHub Pages + Jekyll would be a good solution. And it wasn’t bad at all. Jekyll is totally usable (albiet slow to build, and an awkward templating language in Liquid). And GitHub Pages made the solution feel nice and tidy. GitHub Pages provides lots of value; code source-of-truth, automated CI/CD workflows, and hosting, all in one package. Plus it’s free as long as you use a public repository! However, by the time I had began adding more features, the ease-of-use that GitHub Pages & Jekyll promosed felt like it got in my way more than it helped.
I’ll probably revisit GitHub Pages the next time I need to make a simple website. But I’m not sure I’d use Jekyll again.
Hugo
Then I tried Hugo. After setting up a local test site and trying out a few themes, I immediately saw the improvements over Jekyll. It’s faster to work with, and the framework’s structure just made more sense to me.
After experimenting with and extending a few of the minimal Hugo themes, I decided I’d rather stand on the shoulders of giants before me, and use a more fleshed out theme. I chose Bilberry Hugo Theme by Lednerb. I liked all the content types he created (called “archetypes” in Hugo), and the theme itself works nicely for a simple personal blog. He also included easy-to-setup search functionality with Algolia, and one-line Disqus integration for comments.
The CSS and JavaScript libraries used in Bilberry might be chunkier than a minimal theme, and I’m not a big fan of custom fonts, but it still feels pretty snappy to me compared to a traditional solution with a low-powered backend. And it doesn’t take much front-end dev experience to tweak those aspects to my satisfaction.
Hosting
As for the back-end, I wanted to move away from GitHub Pages. I wanted the option of using a private repository, and serving static files is something anyone can do and little or no cost. I chose Azure Static Web Apps because: a) it’s free, b) I prefer Azure over AWS and GCP, and c) it’s free. I’ll still use GitHub for my code repository and GitHub Actions for easy CI/CD tasks.
And finally I’m wrapping my site around a free CloudFlare account for caching and other nifty features. I’m using them for DNS anyway, it’s only an extra few clicks to setup.
Meeting my design goals?
| Goal | Result |
|---|---|
| Free | yep |
| Performant | It’s a static site with no waiting on slow database calls. Easily cachable in CDNs. Works for me. |
| Scalable (traffic growth) |
I don’t know what’s easier to scale than a static site! And Azure Static Web apps allow for 100GB traffic per month. |
| Scalable (content growth) |
Azure Static Web Apps is free for apps <250 MB in size. |
| Easy to maintain (code & infrastructure) |
Extremely easy |
| Easy to maintain (content publishing) |
Not quite as simple as a full fledged CMS backend, but passible |
| Custom domain | yep |
| No third-party branding | yep |
| No ads | With exception of potential ads from free Disqus plan, yep |
Ok so let’s build this thing.
Prerequisites
- A free GitHub account
- A free Algolia account (if you want search)
- A free Disqus account (if you want comments)
- An Azure subscription (credit card required, but you won’t be charged if you stick to free services)
- A domain name you want to use, and ability to edit its DNS
- Setup your dev environment by installing:
Create the Hugo site, add a theme, and serve it locally
Note: these steps are specific to the Bilberry theme, but the general concept is the same for all. You can have multiple themes ‘installed’ and swap between them from inside the config.toml file, however keep in mind that different themes may have different ‘archetypes’ (post/page type definitions) so you’ll want to settle on one theme before you create too much content.
- Create a new Hugo site by running
hugo new site my-new-sitefrom wherever you want to store your project locally. If you’re really new to this kind of stuff, I recommend just using the terminal within VS Code (cmd, PowerShell, bash, etc are all available within VS Code). The directory Hugo creates (e.g.my-new-site) will be the root of your project. - Download the latest version of Bilberry Hugo Theme. Download the .zip and extract it into the
themesdirectory. Or do this if you’d prefer command line (assuming bash, and assuming you don’t want to use git submodules):
cd my-new-site/themes
git clone --depth=1 --branch=master https://github.com/Lednerb/bilberry-hugo-theme.git
rm -rf ./bilberry-hugo-theme/.git
- Copy the the contents of
themes/bilberry-hugo-theme/exampleSite/into the project root directory (replacing existing files). This is an easy way to get started and get familiar with the structure of a Hugo project (and this theme’s archetypes in particular). It also copies over an exampleconfig.tomlfile. - Remove the default archetype file that comes with Hugo (found at
archetypes/default.md) so the custom archetypes in the Bilbery theme take effect (it’s weird to me that theme archetypes don’t override the default one, but it doesn’t). - Take a look at
config.tomland get familiar. The full docs are here but the basics are self explanitory. Make any changes you want and then… - Run
hugo serveto serve your site locally!! You’ll find it at http://localhost:1313/. Hugo will monitor your files and will automatically rebuild and update your pages on the fly. Magic. Try it out.

I encourage you to play around with the example posts by editing the .md/.markdown files found in content/. Make some of your own posts and double check Hugo and this theme is suitable for you before you continue.
If you’re new to Markdown google markdown cheat sheets. It’s very easy and before long you’ll be authoring content faster than you would in most WSIWYG editors. And if you find yourself limited by Markdown’s capabilities, you can always just write in some raw html, or use Hugo shortcodes for frequently used objects such as a Twitter post embed or a YouTube video.
It’s certainly a different way of handling content compared to a traditional CMS with a database. But the benefits of static site generators make it completely worth it in my opinion. In future I might look into using something like Netlify CMS to have a fancy graphical interface to manage my content. And you’d certaintly want that if you’re delegating web content management to a non-technical user.
TIP: You can run hugo to build your site locally. You’ll see all the files appear in public/. Use this if you just want to copy-paste them somewhere over FTP, host on Dropbox or wherever. And sometimes it’s useful to check what Hugo will actually build.
Setup source control in GitHub
So assuming everything worked as expected, and you’re happy with Hugo and the theme, it’s about time we setup source control and push an initial commit.
Create a new GitHub repository using whatever method you’re familiar with. GitHub desktop makes it easy for git-noobs, just create a new repo from an existing folder. Make sure the repository name is the same as the project root folder name.
You can also make a new repository from GitHub website, clone it to an empty folder, move your project files inside it, then commit and push to remote origin.
You’ll want to create a .gitignore file in the root directory of your project, containing just one line:
public/
We don’t need public/ in source control because we’ll use GitHub Actions to run Hugo to generate our public files for us right before they’re uploaded to Azure. More on that later.
Setup automated deployment to Azure Static Web Apps
Obviously skip this if you have another host in mind. But I like Azure and their new Static Web Apps service is now generally available and has a free tier. It’s not just a trial either, it’s permanently free. Awesome.
- Head to portal.azure.com and make a new Static Web App resource. Give it a resource group, pick a plan type, chose region, etc.
- Select GitHub for the deployment source and authenticate using the button.
- Select your GitHub org and your new repository, main branch.
- Select Hugo as the Build Preset. If for some reason the Build Preset isn’t their, you want these values:
- App location - where GitHub actions will look for your Hugo files:
/ - API location - where Azure will look for Azure Functions definitions if you make any:
api(blank defaults toapianyway) - Output location - where the generated static files will end up:
public - Don’t forget to modify these values if you changed up your project directory structure and don’t have the Hugo site in the root.
- App location - where GitHub actions will look for your Hugo files:
- Set some tags if you like, then Create the resource.
Azure will now do this for us:
- Deploy your Static Web App resource in Azure, empty for now.
- Add a new secret in your GitHub repository called
AZURE_STATIC_WEB_APPS_API_TOKEN_SOMETHING_RANDOM. - Authenticate with GitHub and create a new
.yamlfile in your GitHub repo at/.github/workflows/. You should check it out. This is how GitHub actions works. Whenever a new push is detected, GitHub will run the jobs defined in this file. Specifically it will run whatever is defined at Azure/static-web-apps-deploy, which for our purposes includes:- run Hugo
- check for Azure Function definitions, and deploy/update them if found
- upload the static files into the Azure Static Web App resource, making them live!
So go ahead and make a change, commit your changes and push them to GitHub. You should see the workflow in the Actions tab in your GitHub repo. The whole workflow only takes a minute or two.
Free GitHub accounts get 2000 build minutes per month. I think I can live with updating my website less than 1000 times per month.
If you want to push a commit to GitHub and not have the Actions workflow run, prepend your commit message with [no ci]. GitHub will have your up-to-date changes but your live site won’t update and you won’t consume build minutes.
Once the GitHub Actions workflow is complete, your site should be live at the randomly generated azurestaticapps.net URL. Now just add a custom domain from Azure, valide via a TXT DNS record, and CNAME your domain over to your randomly generated URL (Azure gives you instructions if you’ve not done this before).
Yay, a working website! Highly performant, easily scalable, and free!

If the site looks unstyled when viewing from the Azure URL, check this: absURL vs relURL.
Setup Algolia search and automate the index upload
An obvious drawback to static websites is the lack of built-in dynamic features like search. However, the JAMstack approach recommends JavaScript, APIs and Microservices to provide dynamic functionality. So let’s do that.
Algolia is an online search service. You feed it an index, and it gives you an API endpoint to run searches against. It’s pretty fast and it’s free for small sites (<10,000 records in the index and <10,000 search requests per month).
The creator of the Bilberry theme has Algolia setup instructions at his GitHub repo. It’s a good start and you should read them before continuing. But I wanted to automate this manual process. Here’s how I setup my site:
- Follow the initial setup steps linked above.
- Use the
algolia-index-upload.pyscript included with the theme, but don’t run it ourselves. Instead, add it to the GitHub Action definition. Specifically, add these lines immediately below theBuild And Deploystep within theBuild And Deployjob within the workflow.yamlfile Azure generated for us:
- name: install algolia python client  # the container GitHub spins up won't have the algolia client installed, so we install it
  run: pip install --upgrade 'algoliasearch>=2.0,<3.0'
- name: run algolia index uploader  # run the python script using our secrets
  run: python3 algolia-index-upload.py -f public/index.json -a ${{ secrets.ALGOLIA_APP_ID }} -k ${{ secrets.ALGOLIA_ADMIN_API_KEY }} -n ${{ secrets.ALGOLIA_INDEX_NAME }}
- And don’t forget to create the three new Secrets in your GitHub repo, which are referenced above.
Try it out by pushing another commit.
Setup Disqus for comments
This is really simple.
- Sign up for Disqus and go through their setup for a new site.
- Add your Disqus shortname to the
config.tomlfile. That’s it!
Note: free Disqus accounts may serve ads above your comments section. According to Disqus pricing page: “For personal blogs, .edu sites, and nonprofits, Disqus advertising is optional. If you are a small, non-commercial site, you can self identify for a free subscription to our Plus plan.”. I’ve requested a free upgrade to Plus, I’ll update this post if it works.
Update: Disqus got back to me and upgraded my plan to “Plus” for free. Yay
Customising the CSS and fonts
You’ll probably want to tweak the visual design of your site. Because this theme uses Laravel Mix for bundling and preprocessing, you can’t just go editing the minified CSS files found in themes/bilberry-hugo-theme/static/ (well you can, but don’t). So follow the steps described here to get started.
Short version:
npm installfrom within thethemes/bilberry-hugo-theme/directory- Make changes to the assets found in
themes/bilberry-hugo-theme/assets/(_variables_.scssis a good place to start for simple colour changes) npm run devto preview your changes. Assuminghugo serveis still running, you’ll see your local site updating pretty quickly.npm run prodonce you’re happy with the changes, and then you’re ready to commit to source control.
For easy font changes, this site is amazing: Google Webfonts Helper. Just pick your font, select style & weight variants, and it spits out all the files to download plus the CSS to copy paste into _fontface.scss! Much easier than going via Google Fonts directly. Google Fonts is good for finding the font you want to use, but they don’t have easy multi-format downloads available.
absURL vs relURL
I had some asset loading issues caused by the use of absolute URLs. Everything worked fine locally, and worked fine when viewed from my proper domain name. But when using the Azure static app random domain, asses were trying to be loaded from my custom domain which was not yet setup.
I really don’t like absolute URLs so I converted everything to relative URLs which solved these issues. I took a sledge-hammer approach and just find-replaced all instances of absURL in my project to relURL. My baseURL value in config.toml still needs a full URL so the sitemap.xml will generate full absolute URLs (which is required for sitemaps).
The site now works everywhere, and I haven’t noticed any issues yet…
Change markup engine from Blackfriday to Goldmark
Blackfriday was replaced by Goldmark in Hugo version 0.60. I assume the Bilberry theme is older than Hugo 0.60. I wanted to use some of Goldmark’s features to I swapped to it.
In config.toml, comment out
[blackfriday]
  hrefTargetBlank = false
and add in the Hugo Goldmark defaults:
[markup]
  [markup.goldmark]
    [markup.goldmark.extensions]
      definitionList = true
      footnote = true
      linkify = true
      strikethrough = true
      table = true
      taskList = true
      typographer = true
    [markup.goldmark.parser]
      autoHeadingID = true
      autoHeadingIDType = "github"
      [markup.goldmark.parser.attribute]
        block = false
        title = true
    [markup.goldmark.renderer]
      hardWraps = false
      unsafe = false # set this to true if you want use raw HTML within your markdown!
      xhtml = false
Related extras
Here’s some other related stuff:
Use a custom 404 page instead of the default Azure branded 404 page
Open external links in new tab with Goldmark markdown renderer in Hugo